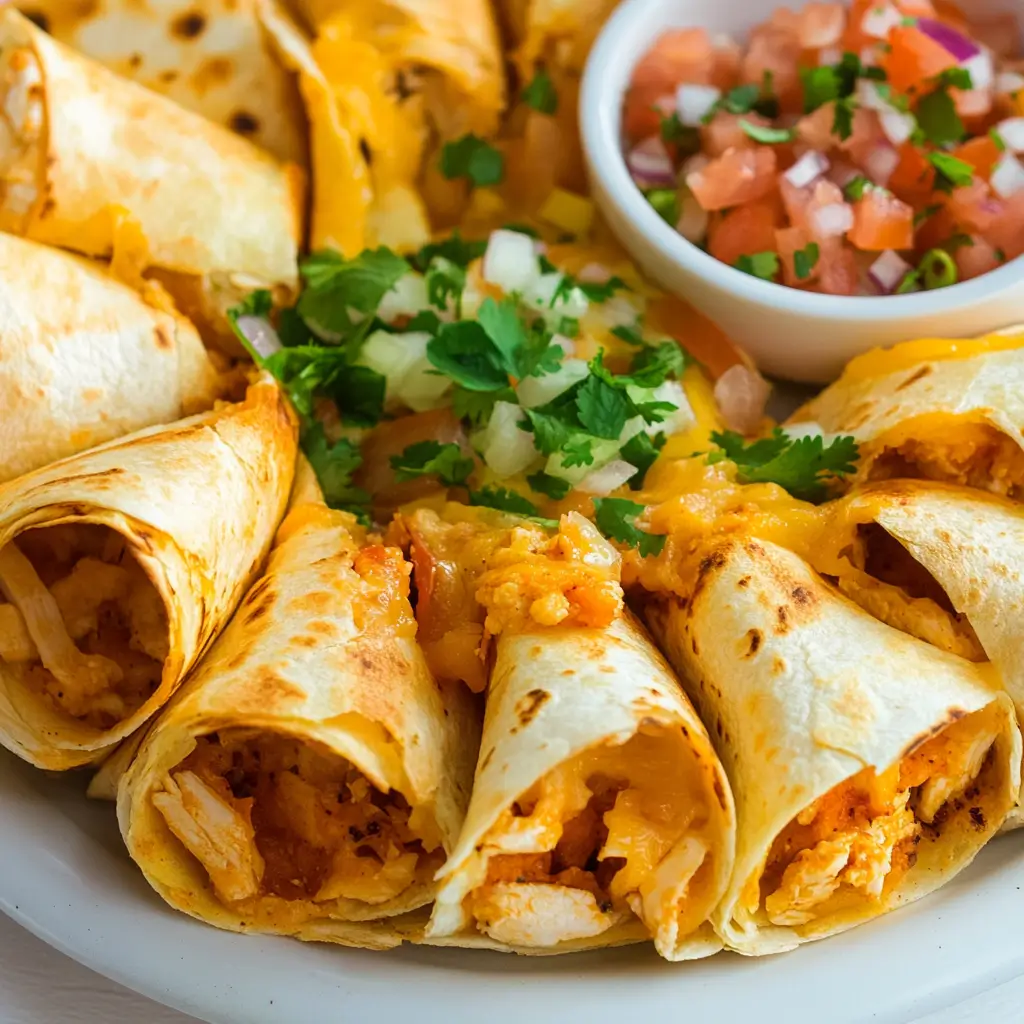
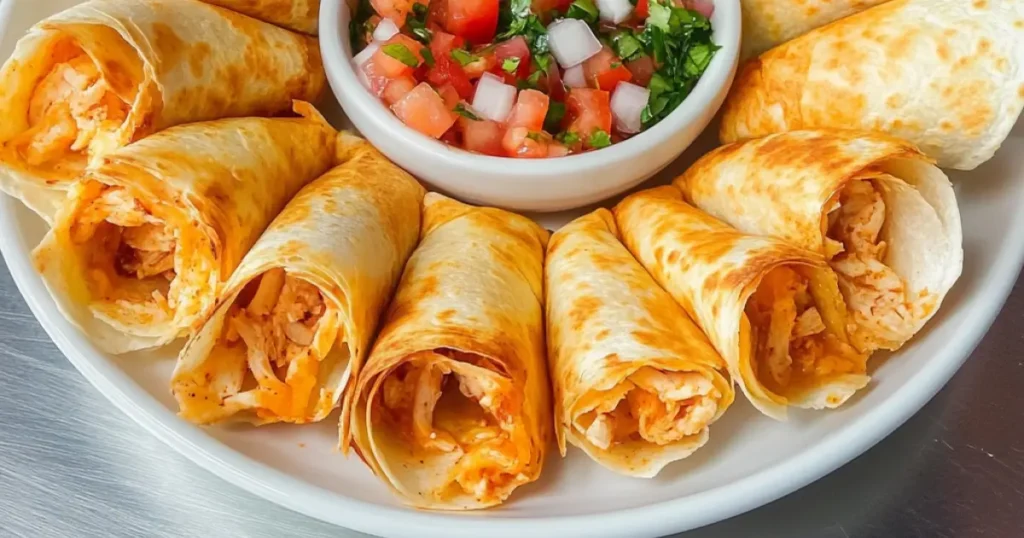
let’s talk quesadillas—because this isn’t your average snack. Say hello to the blooming quesadilla ring! Trust me, this beauty is guaranteed to be the star of your next get-together. Whether you’re throwing a Super Bowl party, planning a cozy movie night, or just looking to impress your friends, this dish checks all the boxes. It’s cheesy, crispy, totally shareable, and let’s be real, it looks downright awesome on the table. Oh, and the best part? It’s so much fun to make!
Let’s dive into everything you need to know—from the ingredients to step-by-step instructions, plus a few tips and tricks to make it easier than ever. Oh, and I’ll answer a few FAQs at the end to help you nail it every time.
Why the Blooming Quesadilla Ring Rocks
Here’s the deal. You could make a plain stack of quesadillas, but why not take it up a notch with a presentation that’s both practical and impressive? Picture this: a blooming ring of golden quesadillas surrounding a bowl of creamy dip. Everyone pulls off a triangle, and BOOM—instant party vibes.
What’s great about this dish is that it’s super versatile. You can customize the fillings, make it ahead, or even go meatless. And the best part? It’s beginner-friendly. If you can fold a tortilla, you’re already halfway there.
What You’ll Need
First things first: ingredients. You don’t need anything fancy, but the magic happens when you combine all these simple items.
For the Quesadilla Ring:
- Large tortillas (10–12, depending on your baking dish)
- Shredded cheese (cheddar, Monterey Jack, or a blend—go crazy!)
- Cooked protein (shredded chicken, ground beef, or beans for a vegetarian option)
- Veggies (diced bell peppers, onions, or jalapeños if you like a kick)
- Seasoning (taco seasoning works perfectly)
- Olive oil or melted butter (for brushing)
For the Dip:
- Sour cream (or Greek yogurt, if you’re feeling healthy-ish)
- Guacamole
- Salsa
- Optional add-ons: fresh cilantro, lime wedges, or a sprinkle of chili powder for flair
Step-by-Step: Making the Blooming Quesadilla Ring
Let’s get to the fun part! Follow these steps, and you’ll have a gorgeous quesadilla ring ready to wow your guests.
Step 1: Prep Your Fillings
Start by cooking your protein and veggies. Season everything well—this is where the flavor happens. If you’re using shredded chicken, toss it with taco seasoning and a splash of water. For ground beef, cook it with onions and seasoning. Vegetarian? Sauté black beans with some diced peppers and spices.
Once cooked, let everything cool slightly. (No one wants a soggy tortilla!)
Step 2: Assemble the Quesadillas
Lay out your tortillas and sprinkle a generous handful of shredded cheese over half of each one. Add a spoonful of your filling on top, then fold the tortilla in half to form a half-moon shape. Easy, right?
Step 3: Arrange the Ring
Grab a large round baking dish or a pizza pan. Place a small oven-safe bowl in the center—that’s where your dip will go later. Arrange the folded tortillas in a circle around the bowl, overlapping slightly. It should look like a flower or sunburst pattern.
Step 4: Brush and Bake
Brush the tops of the tortillas with olive oil or melted butter. This helps them crisp up and turn golden brown. Pop the whole thing into a preheated oven at 375°F and bake for 20–25 minutes, or until the tortillas are crispy and the cheese is melty.
Step 5: Add the Dip
Once your quesadilla ring is out of the oven, carefully remove the bowl from the center (it might be hot!) and fill it with your dip of choice. Sour cream, guac, and salsa are classics, but you can mix it up with queso or even a spicy ranch.
Tips for Perfecting Your Quesadilla Ring

- Don’t overfill: Too much filling makes the tortillas hard to fold and might get messy in the oven.
- Use a mix of cheeses: Combining cheddar with something melty like Monterey Jack or mozzarella gives you the perfect gooey texture.
- Make it ahead: You can assemble the ring a few hours in advance and bake it when you’re ready to serve.
- Keep it warm: If you’re not serving immediately, keep the ring in a low oven (around 200°F) to stay toasty.
Why This Recipe Is a Crowd-Pleaser
Americans love their finger foods, and this quesadilla ring is basically the MVP of snacks. It’s got everything you could want: crispy edges, gooey cheese, and bold flavors. Plus, it’s interactive—everyone loves pulling off their piece and dipping it into something delicious. If you’re looking to make an impression without slaving away in the kitchen, this is your ticket.
Variations to Try
- Spicy Kick: Add chopped jalapeños or a sprinkle of chili flakes to the filling.
- BBQ Chicken: Swap taco seasoning for BBQ sauce and use shredded rotisserie chicken.
- Breakfast Version: Fill with scrambled eggs, cheese, and crumbled bacon or sausage.
- Sweet Spin: For dessert, use Nutella and bananas or apple pie filling with a cinnamon-sugar sprinkle.
FAQs About Blooming Quesadilla Ring
u003cstrongu003e1. Can I make this without meat?u003c/strongu003e
Absolutely! Swap the protein for black beans, pinto beans, or even sautéed mushrooms. Just make sure the filling is well-seasoned.
u003cstrongu003e2. How do I keep the tortillas from getting soggy?u003c/strongu003e
Let your cooked fillings cool slightly before assembling, and don’t overstuff. Also, brush the tortillas with oil or butter to help them crisp up in the oven.
u003cstrongu003e3. What’s the best way to reheat leftovers?u003c/strongu003e
The oven is your best friend here. Pop the quesadilla pieces on a baking sheet and reheat at 350°F for 10–12 minutes to keep them crispy.
u003cstrongu003e4. Can I use smaller tortillas?u003c/strongu003e
Sure! Just adjust the number of tortillas and overlap them more closely in the ring.
u003cstrongu003e5. What’s the best dip to serve with this?u003c/strongu003e
Sour cream, guacamole, and salsa are classics, but queso or a creamy chipotle sauce also works beautifully.
Final Thoughts
This blooming quesadilla ring is more than just food—it’s an experience. Whether you’re feeding a hungry crowd or just making a fun dinner for your family, it’s guaranteed to bring smiles to the table. So, grab some tortillas, raid your fridge for fillings, and get ready to impress. You’ll thank me later when everyone’s asking for the recipe (and trust me, they will).
PrintBlooming Quesadilla Ring
An impressive and delicious quesadilla ring that’s perfect for gatherings. Cheesy, crispy, and fun to make!
- Prep Time: 15 minutes
- Cook Time: 25 minutes
- Total Time: 40 minutes
- Yield: 6-8 servings
- Category: Appetizer
- Method: Baking
- Cuisine: Mexican
- Diet: Vegetarian Option Available
Ingredients
- 10–12 large tortillas
- Shredded cheese (cheddar, Monterey Jack, or a blend)
- Cooked protein (shredded chicken, ground beef, or beans for vegetarian option)
- Diced bell peppers, onions, or jalapeños
- Taco seasoning
- Olive oil or melted butter (for brushing)
- Sour cream (or Greek yogurt)
- Guacamole
- Salsa
- Fresh cilantro, lime wedges, or chili powder (optional)
Instructions
- Prep your fillings by cooking your protein and veggies, seasoning well.
- Assemble the quesadillas by laying out tortillas, adding cheese and filling, and folding in half.
- Arrange the folded tortillas in a circle around an oven-safe bowl placed in the center of a baking dish.
- Brush the tops with olive oil or melted butter, then bake at 375°F for 20–25 minutes.
- Add your dip to the bowl once the quesadilla ring is baked.
Notes
Don’t overfill the tortillas, and keep them warm in a low oven if not serving immediately.


